By Fathalla Ramadan
March 2026
How do enterprises stay online when one ISP fails?
The answer: BGP multi-homing.
In this lab, you’ll simulate a realistic dual-ISP architecture—just like those used by banks, cloud providers, and critical infrastructure worldwide.
You’ll configure an Enterprise-Edge router to connect to two ISPs, advertise its internal network, and maintain connectivity even if one link fails—all using free, legal tools on your laptop.
Note: This lab uses FRRouting (an open-source routing suite with full BGP support) instead of Cisco IOSv, since Cisco no longer provides public downloads of IOSv, and DevNet images are licensed only for Cisco Modeling Labs (CML)—not GNS3.
This is Lab 14.1 from the IP Routing and Switching Lab Handout Book, now shared free for serious learners everywhere.
What You’ll Learn
- Configure eBGP with two different ISPs
- Advertise your enterprise network (
192.168.10.0/24) to the internet - Achieve automatic failover during ISP outages
- Validate reachability to a simulated Web Server
What You’ll Need
- GNS3 installed (see GNS3 Windows Legal Setup Guide)
- 4 devices:
- Enterprise-Edge (your company router – use FRRouting)
- ISP-A (use FRRouting)
- ISP-B (use FRRouting)
- Web-Server (use Cloud node or lightweight Linux VM)
Alternative: If you have Cisco Modeling Labs (CML) Personal Edition ($199/year), you may run this lab with real IOS-XE routers. But FRR delivers identical BGP behavior—free and legally.
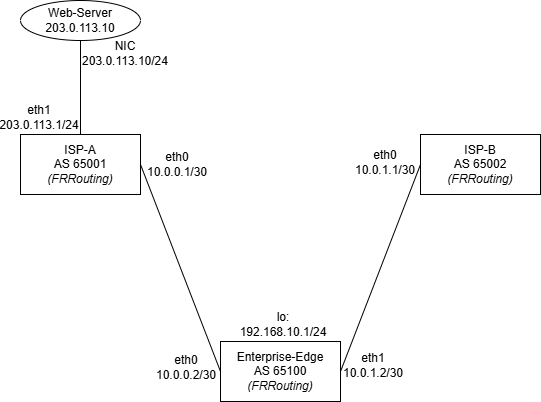
IP Addressing Plan
| Device | Interface | IP Address | Subnet Mask |
|---|---|---|---|
| Enterprise-Edge | Loopback0 | 192.168.10.1 | 255.255.255.0 |
| eth0 | 10.0.0.2 | 255.255.255.252 | |
| eth1 | 10.0.1.2 | 255.255.255.252 | |
| ISP-A | eth0 | 10.0.0.1 | 255.255.255.252 |
| eth1 | 203.0.113.1 | 255.255.255.0 | |
| ISP-B | eth0 | 10.0.1.1 | 255.255.255.252 |
| eth1 | 198.51.100.1 | 255.255.255.0 | |
| Web-Server | NIC | 203.0.113.10 | 255.255.255.0 |
Step 1: Build the Topology in GNS3
Important: As of 2026, GNS3 does not include a built-in appliance store. To use FRRouting:
- Obtain a legal FRRouting
.gns3aor.qcow2file (e.g., from the official FRRouting GitHub or community builds—if available)- In GNS3, go to File → Import Appliance
- Select the downloaded file and follow prompts to install
Note: Publicly available, ready-to-use FRRouting appliances are not consistently accessible. Many learners may not be able to complete this step.
Alternative: Study BGP concepts using Wireshark PCAP analysis (as in Lab 14.2 of your Lab Handout Book) or focus on Packet Tracer for core CCNA topics.
Once FRR is installed:- Add 3x FRR nodes: Name them
Enterprise-Edge,ISP-A,ISP-B- Add 1x Cloud node: Name it
Web-Server- Connect:
Enterprise-Edge eth0↔ISP-A eth0Enterprise-Edge eth1↔ISP-B eth0ISP-A eth1↔Web-Server
Step 2: Configure All Devices
On Enterprise-Edge (AS 65100)
configure terminal
!
interface lo
ip address 192.168.10.1/24
!
interface eth0
ip address 10.0.0.2/30
no shutdown
!
interface eth1
ip address 10.0.1.2/30
no shutdown
!
router bgp 65100
neighbor 10.0.0.1 remote-as 65001
neighbor 10.0.1.1 remote-as 65002
network 192.168.10.0/24
!
end
write memory
On ISP-A (AS 65001)
configure terminal
!
interface eth0
ip address 10.0.0.1/30
no shutdown
!
interface eth1
ip address 203.0.113.1/24
no shutdown
!
router bgp 65001
neighbor 10.0.0.2 remote-as 65100
!
ip route 0.0.0.0 0.0.0.0 eth1
!
end
write memory
On ISP-B (AS 65002)
configure terminal
!
interface eth0
ip address 10.0.1.1/30
no shutdown
!
interface eth1
ip address 198.51.100.1/24
no shutdown
!
router bgp 65002
neighbor 10.0.1.2 remote-as 65100
!
ip route 0.0.0.0 0.0.0.0 eth1
!
end
write memory
On Web-Server
- Set IP:
203.0.113.10 - Set Default Gateway:
203.0.113.1(ISP-A’s external interface)
Step 3: Verify BGP & Connectivity
- On Enterprise-Edge:
- show ip bgp summary
- → Both neighbors (
10.0.0.1,10.0.1.1) should be Established.
- On ISP-A and ISP-B:
- show ip route bgp
- → Both should see:
B 192.168.10.0/24 [20/0] via <neighbor>
- From Web-Server, ping the enterprise loopback
- ping 192.168.10.1
- → Should succeed via ISP-A.
Step 4: Test Failover
- On Enterprise-Edge, shut down the link to ISP-A
- interface eth0
- shutdown
- Wait 30–60 seconds.
- From Web-Server, ping again
- ping 192.168.10.1
- → Still works! Traffic now flows through ISP-B.
Success: Your enterprise is now multi-homed—resilient by design.
Key Takeaways
- eBGP enables communication between autonomous systems (your AS vs. ISPs)
- Network statement advertises your internal subnet to the world
- Dual upstream links = automatic redundancy
- Real internet traffic would reach you via either ISP’s public IP space
Go Deeper
Want the full Lab 14.1 with:
- Professional validation checklists
- Advanced scenarios (load balancing, AS_PATH prepending)
- Troubleshooting guides for common BGP failures?
Get Lab 14.1 in your Lab Handout Book—includes 25 other hands-on labs from VLANs to VXLAN automation.
Final Thought
Multi-homing isn’t just for telecom giants.
In today’s digital economy, every critical service needs resilient connectivity.
And now—you’ve built it yourself using bgp multihoming gns3 lab… legally, freely, and correctly.
—
Fathalla Ramadan
Network Architect & Educator
35+ years in IT, networking, and technology education across the Middle East and beyond
One Response